In today’s fast-paced digital world, a slow computer can be incredibly frustrating, disrupting productivity and causing unnecessary stress. One of the key tools at your disposal for diagnosing and resolving these performance issues is the Windows Task Manager. Often overlooked, this built-in utility offers a wealth of information that can help you pinpoint the processes and applications responsible for bogging down your system. In this guide, we’ll delve into the intricacies of Task Manager, focusing on Windows Task Manager Optimization techniques to help you streamline your PC’s performance. By understanding and managing the secret life of your task manager, you can unveil and address the underlying issues that are causing your computer to lag.
Identifying High CPU Usage Processes
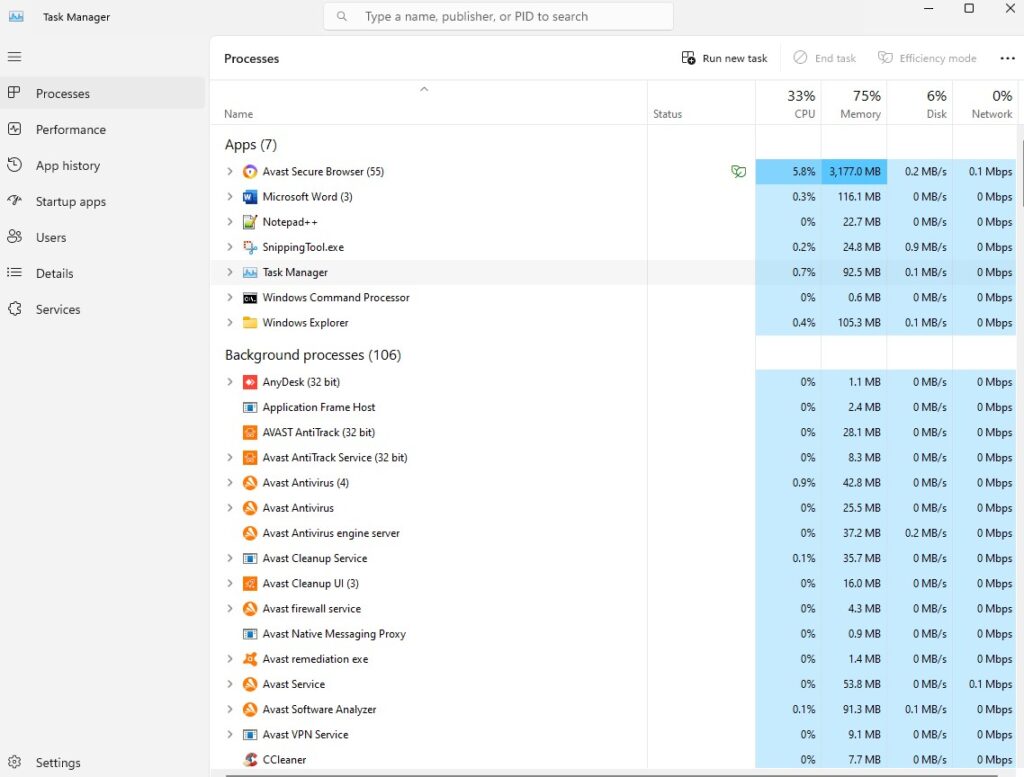
High CPU usage can significantly slow down your computer, making it crucial to identify and manage resource-hungry processes. To get started, open the Windows Task Manager by pressing “Ctrl + Shift + Esc” or right-clicking the taskbar and selecting “Task Manager.” Once open, navigate to the “Processes” tab, where you’ll see a list of all running applications and background processes. Here, you can sort the list by CPU usage by clicking on the “CPU” column header. This will bring the most demanding processes to the top, allowing you to quickly identify which programs are consuming the most resources.
When you spot a high CPU usage process, it’s important to determine whether it’s essential or if it’s a rogue application causing unnecessary strain. Common culprits include web browsers with multiple tabs open, video editing software, or even malware. Right-click on the offending process to see more options; from here, you can choose to end the task, open the file location for further investigation, or search online to understand its purpose better.
If you find that a necessary program is consistently using too much CPU, consider updating it or checking its settings for optimization options. Sometimes, simply restarting your computer can resolve temporary spikes in CPU usage. By regularly monitoring and managing high CPU usage processes through Task Manager, you can keep your computer running smoothly and efficiently.
Managing Memory-Intensive Applications
Managing memory-intensive applications is crucial for maintaining your computer’s performance, especially when multitasking. To identify which programs are consuming the most memory, open the Windows Task Manager by pressing “Ctrl + Shift + Esc” or right-clicking the taskbar and selecting “Task Manager.” Once there, navigate to the “Processes” tab and click on the “Memory” column header to sort the list by memory usage. This will allow you to quickly spot applications that are using a significant amount of your system’s RAM.
Once you’ve identified memory-hogging applications, evaluate whether they are essential or if they can be closed to free up resources. For instance, web browsers with multiple tabs open, multimedia editing software, and large spreadsheets can consume a lot of memory. Right-click on any unnecessary process and select “End Task” to close it. If a necessary application is using too much memory, consider checking for updates or adjusting its settings to reduce its footprint.
Regularly monitoring and managing memory usage through Task Manager can prevent your computer from becoming sluggish. In addition, restarting your machine periodically can help clear temporary memory usage spikes caused by prolonged uptime. By keeping an eye on memory-intensive applications and making adjustments as needed, you can ensure your computer runs smoothly and efficiently, enhancing your overall productivity.
Understanding Disk Usage and I/O Operations
Understanding disk usage and I/O (Input/Output) operations is essential for maintaining your computer’s performance and preventing slowdowns. Disk usage refers to how much of your hard drive or SSD’s capacity is being used, while I/O operations involve the reading and writing of data to and from the disk. When your disk usage is consistently high, it can lead to sluggish performance and longer load times for applications. To monitor disk usage, open the Windows Task Manager by pressing “Ctrl + Shift + Esc” or right-clicking the taskbar and selecting “Task Manager.” Navigate to the “Processes” tab and click on the “Disk” column header to sort processes by their disk usage, making it easy to identify which applications are demanding the most from your storage device.
High disk usage can be caused by various factors, including background processes like antivirus scans, Windows updates, or even malware. If you notice a particular process consuming a lot of disk resources, right-click on it and select “End Task” if it’s non-essential. For essential processes, consider scheduling them during off-peak hours to minimize their impact on your system’s performance. Additionally, regularly clearing temporary files and ensuring that your storage drive has ample free space can help in reducing disk usage.
Understanding I/O operations is equally important; these operations are the communication between your computer’s memory and storage devices. High I/O activity can result in longer load times and reduced responsiveness. To manage I/O operations effectively, consider using tools like disk defragmenters for HDDs or TRIM commands for SSDs to optimize data retrieval speeds. By keeping an eye on both disk usage and I/O operations through Task Manager, you can identify bottlenecks and take proactive steps to enhance your computer’s overall performance and efficiency.
Monitoring Network Activity and Bandwidth Hogs
Monitoring network activity and identifying bandwidth hogs are crucial steps in ensuring a smooth internet experience and optimal computer performance. To get started, open the Windows Task Manager by pressing “Ctrl + Shift + Esc” or right-clicking the taskbar and selecting “Task Manager.” Navigate to the “Processes” tab and click on the “Network” column header to sort processes by their network usage. This will help you see which applications are consuming the most bandwidth, making it easier to pinpoint any that might be slowing down your internet connection.
High network usage can be caused by various factors such as large file downloads, streaming services, cloud backups, or even malicious software. If you notice a particular application using an excessive amount of bandwidth, right-click on it and select “End Task” if it’s not essential. For necessary applications, consider adjusting their settings to limit bandwidth usage or schedule heavy tasks during off-peak hours. Keeping an eye on your network activity can help you manage your bandwidth more effectively, ensuring a smoother online experience for all your internet activities.
Regularly monitoring network activity through Task Manager can also alert you to potential security threats such as malware or unauthorized applications consuming your bandwidth without your knowledge. By taking proactive steps to identify and manage bandwidth hogs, you can enhance your overall internet performance and maintain a secure, efficient computing environment.
Analyzing Startup Programs and Services
Analyzing startup programs and services is essential for improving your computer’s boot time and overall performance. When you turn on your computer, certain programs and services launch automatically, which can significantly slow down the startup process if too many are running. To manage these, open the Windows Task Manager by pressing “Ctrl + Shift + Esc” or right-clicking the taskbar and selecting “Task Manager.” Navigate to the “Startup” tab to see a list of all programs set to run at startup, along with their impact on your system’s boot time. Here, you can easily identify which applications are necessary and which ones can be disabled to speed up your computer’s startup.
Disabling non-essential startup programs is straightforward. Simply select the program you want to disable and click the “Disable” button at the bottom right of the Task Manager window. Common culprits that can be safely disabled include software updaters, cloud storage apps, and unnecessary utilities. By reducing the number of programs that launch at startup, you can significantly decrease boot time and improve your computer’s overall performance.
Regularly reviewing and managing your startup programs ensures that only essential applications run when your computer boots up, allowing for a faster and more efficient experience. This simple yet effective optimization technique can make a noticeable difference in how quickly your system becomes ready for use, enhancing productivity and reducing frustration.
Utilizing Resource Monitor for In-Depth Analysis
Utilizing Resource Monitor for in-depth analysis is a powerful way to gain a detailed understanding of your computer’s performance and troubleshoot issues effectively. Resource Monitor is a built-in Windows tool that provides real-time data on CPU, memory, disk, and network usage, allowing you to identify which processes and applications are consuming the most resources. To access Resource Monitor, simply type “Resource Monitor” into the Windows search bar and select the application. Once open, you’ll see a comprehensive dashboard where you can dive deep into each category, offering more granular insights than Task Manager alone.
One of the key advantages of using Resource Monitor is its ability to track individual processes and their resource consumption over time. For example, you can monitor specific applications to see how they impact your CPU usage or identify which programs are causing high disk activity. This level of detail can help you pinpoint performance bottlenecks and make informed decisions about which processes to end or optimize. Additionally, Resource Monitor’s network tab allows you to see detailed information about network activity, helping you identify bandwidth-hogging applications and potential security threats.
Regularly utilizing Resource Monitor for in-depth analysis not only helps you maintain optimal performance but also enables proactive troubleshooting. By keeping an eye on resource usage trends and identifying anomalies early on, you can prevent minor issues from escalating into major problems. Whether you’re an advanced user or a beginner, leveraging the capabilities of Resource Monitor can significantly enhance your ability to manage and optimize your computer’s performance.
Recognizing and Handling Background Processes
Recognizing and handling background processes is essential for maintaining a fast and efficient computer. Background processes are tasks that run behind the scenes, often without your direct interaction, and can include system updates, software services, or even malware. To identify these processes, open Task Manager by pressing “Ctrl + Shift + Esc” or right-clicking the taskbar and selecting “Task Manager.” Navigate to the “Processes” tab, where you can view all running applications and background tasks. Sorting the list by CPU, memory, or disk usage can help you quickly spot any resource-hogging processes.
Once you’ve identified unnecessary or suspicious background processes, you can take steps to manage them effectively. Right-click on any non-essential process and select “End Task” to free up system resources. For processes that you don’t recognize, it’s a good idea to search online to determine if they’re safe to terminate. Additionally, regularly updating your antivirus software and running scans can help detect and remove malicious background processes that may be slowing down your computer.
Managing background processes not only improves your computer’s performance but also enhances its security. By regularly monitoring Task Manager and taking action on unnecessary tasks, you ensure that your system runs smoothly and efficiently. This proactive approach helps prevent slowdowns and keeps your computer in optimal condition for both work and leisure activities.
Optimizing System Performance through Task Manager Settings
Optimizing system performance through Task Manager settings is a straightforward yet highly effective way to ensure your computer runs smoothly and efficiently. Task Manager, a built-in Windows utility, allows you to monitor and control various aspects of your system’s performance, such as CPU, memory, disk usage, and network activity. By adjusting settings and managing applications within Task Manager, you can quickly identify resource-hogging processes and take action to free up valuable system resources. This optimization not only enhances your computer’s speed but also extends its lifespan by preventing unnecessary wear and tear.
To get started, open Task Manager by pressing “Ctrl + Shift + Esc” or right-clicking the taskbar and selecting “Task Manager.” Navigate to the “Processes” tab to see a list of running applications and background processes. Here, you can sort processes by CPU, memory, disk, or network usage to identify which ones are consuming the most resources. Right-click on any non-essential process and select “End Task” to close it. Additionally, you can manage startup programs by navigating to the “Startup” tab and disabling unnecessary applications that slow down your system’s boot time.
Regularly optimizing your system through Task Manager settings can significantly improve your computer’s overall performance. By taking these simple steps, you can ensure a faster, more responsive computing experience, making everyday tasks more efficient and reducing frustration. Remember to periodically review your Task Manager settings to maintain optimal performance and keep your system running like new.
Diagnosing Hardware vs. Software Performance Issues
Diagnosing hardware vs. software performance issues is crucial for effectively troubleshooting and resolving computer slowdowns. Hardware issues often stem from physical components like the CPU, RAM, hard drive, or cooling system. For example, an overheating CPU or a failing hard drive can cause your computer to run slowly or crash frequently. To identify hardware-related problems, you can use built-in diagnostic tools such as Windows Memory Diagnostic or third-party software like CrystalDiskInfo to check the health of your RAM and hard drive. Additionally, ensure that your computer’s internal components are free from dust and properly ventilated to prevent overheating.
On the other hand, software performance issues are usually related to the operating system, applications, or background processes that consume too many resources. Common culprits include outdated drivers, malware, or too many startup programs running simultaneously. To diagnose software-related problems, you can use Windows Task Manager to monitor CPU, memory, and disk usage by different applications. Regularly updating your operating system and software, scanning for malware, and managing startup programs can significantly improve your computer’s performance.
By understanding the difference between hardware and software performance issues, you can take targeted actions to resolve them effectively. This approach not only saves time but also ensures that your computer runs smoothly and efficiently. Whether you’re dealing with a sluggish system or frequent crashes, diagnosing the root cause—whether hardware or software—enables you to implement the right solutions for optimal performance.